Showing 3254 results

Archival description
1536 results with digital objects Show results with digital objects
Steel Union 1064
CA BI 76-78 · Item · 1950

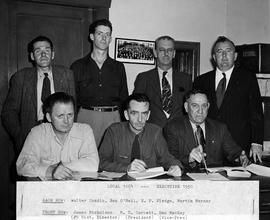
Item is a photograph of the participants in a meeting to discuss coordinated contract negotiations for Dosco locals in Maritimes during Local Union 1064 conciliation proceedings.

Back row: Eamon Park (National Office technical staff), Martin Merner (Member 1064 executive), Bob McNaughton (President Local 1231, Trenton, N.S.), Ben O'Neil (Member 1064 executive), Dan MacKay (Member 1064 executive), name unknown (Financial Consultant during contact negotiations), Cleve Kidd (Director Research Dept. National Office), and Ted Joliffe (Legal Advisor, Toronto).

Front row: M.E. Corbett (President 1064), Walter Codiac (Member 1064 executive), Alphonso Murray (Fin. Secretary, Local 1231, Trenton, N.S.), Clarence MacInnis (Fin. Secretary, Local 1064), Charles Millard (Can National Director U.S.W.A.), E.P. Pledge (Member executive 1064), James Nicholson (#5 District Director).

CA BI 76-79 · Item · 1950

Item is a photograph of the Steel Union Executive Officers 1064.

Back row: Walter Codiac, Ben O'Neil, E.P. Pledge, Martin Merner.
Front row: James Nicholson (#5 Dist. Director), M.E. Corbett (President), Dan MacKay (Vice President).

North Sydney
CA BI 76-8 · Item · 1885

Items are a postcard and two reproductions of that postcard, of the North Sydney waterfront, 1885. Displayed in the foreground are the coal office and coal piers built by the General Mining Association.

CA BI 76-80 · Item · 1954

Item is a photograph of the Steel Union 1064 Executive Officers.

Back row: Martin Merner, E.P. Pledge, Charles Wall, and Bill Mackinnon.
Front row: Clarence MacInnis, Dan MacKay, Ben O'Neil (president), James Nicholson (Director District 5).

CA BI 76-81 · Item · 1956

Item is a photograph of the Local 1064 Executive Officers.

Back row: Donald Steele, William Reid, Lawrence MacIsaac.
Front row: Charles Wall, Martin Merner, Dan MacKay, Clarance MacInnes.

Steel Industry Panel
CA BI 76-82 · Item · 1957 - 1958

Item is a photograph of the following individuals seated at a table: Clifford Murray (Works Manager DOSCO), Martin Merner, Joe Legge (Asst. Safety Superintendent DOSCO) and an unknown man. The occasion was, possibly, a panel discussion on industrial safety.

CA BI 76-83 · Item · ca. 1964

Item is a photograph of Steel Union Executive Officers, Local 1064. The occasion is unknown.

From left to right: Jack Coleman, Charles Crowe, George MacNeil, Art MacGillivray, Martin Merner.

Boisdale School Pupils
CA BI 76-85 · Item · 1925

Item is a photograph of the pupils of Boisdale School, 1925.

Iona Soldiers
CA BI 76-89 · Item · 1914-1918

Item is a photograph of approximately twenty young men, some in uniform, prior to their departure for Europe during World War One.

Richard Henry Brown
76-90 · Item · ca. 1890

Item is a photograph of Richard Henry Brown, General Manager for the General Mining Association from 1867 to 1900. He was also the first Mayor of Sydney Mines.

Beech Hill
CA BI 76-92 · Item · ca. 1900

Item is a photograph of Beech Hills, the home built for mine manager Richard Brown in 1828.

Beech Hill
CA BI 76-93 · Item · ca. 1890

Item is a photograph of Rev. Bambrick, an Anglican Minister, in front of Beech Hill, the residence of the Brown family. Rev. Bambrick was a close friend to the Brown family. Beech Hill, also known as the Richard Brown House, was built in 1828 and registered as Nova Scotia Provincial Heritage Property in 1985.

CA BI 77-1000-1134 · Item · ca. 1918

Item is a photograph of the aftermath of the Halifax Explosion of 1917. This picture shows the ruins at Richmond.

CA BI 77-1001-1135 · Item · ca. 1918

Item is a photograph of the aftermath of the Halifax Explosion of 1917. This picture shows all that was left of a residential section in the North End.

CA BI 77-1002-1136 · Item · ca. 1918

Item is a photograph of the aftermath of the Halifax Explosion of 1917. This picture shows the havoc wrought among stores and homes on Gottingen Street.

CA BI 77-1003-1137 · Item · ca. 1918

Item is a photograph of the aftermath of the Halifax Explosion of 1917. This picture shows Roome Street School in the heart of the devastated area.

CA BI 77-1004-1138 · Item · ca. 1918

Item is a photograph of the aftermath of the Halifax Explosion of 1917. This picture shows crowds swarming into Chebucto Road School to identify the dead.

CA BI 77-1005-1139 · Item · ca. 1918

Item is a photograph of the aftermath of the Halifax Explosion of 1917. This picture shows a view of the Alexander McKay School, resembling a shell-torn building in Flanders.

CA BI 77-1007-1141 · Item · ca. 1918

Item is a photograph of the aftermath of the Halifax Explosion of 1917. This picture shows motor lorries conveying the wounded to the Military Hospital on Camp Hill.

CA BI 77-1008-1142 · Item · ca. 1918

Item is a photograph of the aftermath of the Halifax Explosion of 1917. This picture shows wreckage of Fire Chief Condon's automobile after the explosion.

CA BI 77-1011-1145 · Item · ca. 1918

Item is a photograph of the aftermath of the Halifax Explosion of 1917. This picture shows people searching for bodies in the basement of a school.

CA BI 77-1012-1146 · Item · ca. 1918

Item is a photograph of the aftermath of the Halifax Explosion of 1917. This picture shows the effect of the explosion on rolling stock and track.

CA BI 77-1013-1147 · Item · ca. 1918

Item is a photograph of the aftermath of the Halifax Explosion of 1917. This picture shows coffins piled up in front of Chebucto Road School at the funeral of nearly 100 unidentified dead.

CA BI 77-1014-1148 · Item · ca. 1918

Item is a photograph of the aftermath of the Halifax Explosion of 1917. This picture shows homeless people of the North End who were forced to spend the night in canvas tents.

CA BI 77-1016-1150 · Item · ca. 1918

Item is a photograph of the aftermath of the Halifax Explosion of 1917. This picture shows demolished buildings in Richmond.

Ruins, Halifax Catastrophe
CA BI 77-1017-1151 · Item · ca. 1918

Item is a photograph of the aftermath of the Halifax Explosion of 1917. This picture shows all that remains of several large buildings in the devastated area, where the full force of the explosion was felt.

CA BI 77-1018-1152 · Item · ca. 1918

Item is a photograph of the aftermath of the Halifax Explosion of 1917. This picture shows Clayton & Sons (Clothing Manufacturers), one of the largest buildings in the city, located on Barrington Street. Almost every pane of glass in this building was shattered.

CA BI 77-1019-1153 · Item · ca. 1918

Item is a photograph of the aftermath of the Halifax Explosion of 1917. This picture shows an interior view of the tailoring department of Clayton & Sons with snow piled up on the tables.

CA BI 77-1020-1154 · Item · ca. 1918

Item is a photograph of the aftermath of the Halifax Explosion of 1917. This picture shows rows of unidentified dead in the basement of Chebucto Road School.

CA BI 77-1021-1155 · Item · ca. 1918

Item is a photograph of the aftermath of the Halifax Explosion of 1917. This picture shows rows of canvas tents during the Friday blizzard.

CA BI 77-1022-1156 · Item · ca. 1918

Item is a photograph of the aftermath of the Halifax Explosion of 1917. This picture shows wreckage of homes on the devastated area.

CA BI 77-1023-1157 · Item · ca. 1918

Item is a photograph of the aftermath of the Halifax Explosion of 1917. This picture shows the wreckage of the train entrance to North Street Station; the whole roof was swept away.

CA BI 77-1024-1158 · Item · ca. 1918

Item is a photograph of the aftermath of the Halifax Explosion of 1917. This picture shows the Halifax Herald and the Evening Mail after the explosion.

CA BI 77-1026-1160 · Item · ca. 1918

Item is a photograph of the aftermath of the Halifax Explosion of 1917. This picture shows the motor fire engine "Patricia" after the explosion.

CA BI 77-1027-1161 · Item · ca. 1918

Item is a photograph of the aftermath of the Halifax Explosion of 1917. This picture shows the wreckage of a house after the explosion.

CA BI 77-1028-1162 · Item · ca. 1918

Item is a photograph of the aftermath of the Halifax Explosion of 1917. This picture shows a search for survivors amid the debris in the devastated Richmond section.

CA BI 77-1029-1163 · Item · ca. 1918

Item is a photograph of the aftermath of the Halifax Explosion of 1917. This picture shows all that is left of a home in the Richmond section.

CA BI 77-1030-1164 · Item · ca. 1918

Item is a photograph of the aftermath of the Halifax Explosion of 1917. This picture shows all that is left of a home in the Richmond section.

CA BI 77-1032-1166 · Item · ca. 1918

Item is a photograph of the aftermath of the Halifax Explosion of 1917. This picture shows the Protestant Service at Chebucto Mortuary, from which nearly 100 unidentified dead were buried.

CA BI 77-1034-1168 · Item · 1918

Item is a photograph of the aftermath of the Halifax Explosion. This picture shows the wrecked Richmond Street School, the ruins of the Grove Church with its spire lying towards the school building and at the extreme right, the ruins of the Grove Church manse. This picture was taken in the heart of the devastated area where the full shock of the terrible explosion was felt.

CA BI 77-1035-1169 · Item · 1918

Item is a photograph of the aftermath of the Halifax Explosion. This picture was taken at Fort Needham and shows the wreckage of homes at the top of the hill in the Richmond district.

CA BI 77-1036-1170 · Item · 1918

Item is a photograph of the aftermath of the Halifax Explosion. This picture shows the heap of ruins that once was the old Acadia Sugar Refinery (center in photo), the wrecked building that once was one of the shops in connection with the Dry Dock (right in photo), and the Belgian relief ship "Imo" which collided with the "Mount Blanc" (right in photo).

CA BI 77-1037-1171 · Item · 1918

Item is a photograph of the aftermath of the Halifax Explosion. This picture shows the desolation in the north end of Halifax in the section near the reservoir.